Showing posts with label paper crafts. Show all posts

Tuesday, 20 June 2017

Matchbox ladies

matchbox dioramas

women in history diorama

famous women matchbox art

Hi!
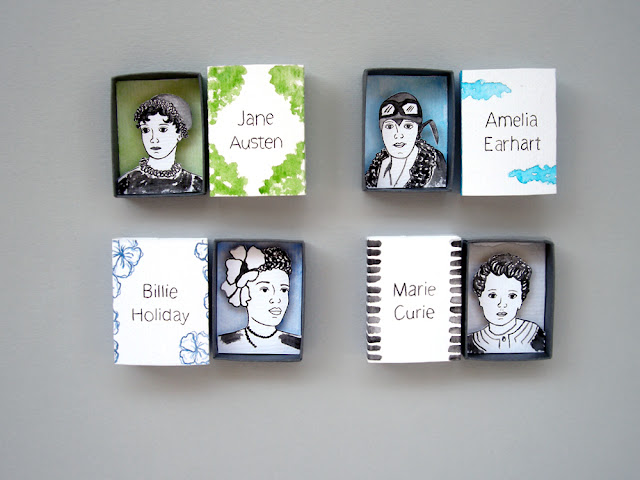
I've had this idea in my head for a while, a sort of collection of matchboxes with a specific theme. I thought of various ideas and there were a couple that seemed more interesting and challenging to me. So here is the one that I picked: I'm making matchboxes with portraits of important women in history. Women that have left their mark in various fields through the years, from science to arts these women have one thing in common: their work is celebrated by all today :-)
Here are four matchboxes I've already made, Jane Austen, Amelia Earhart, Billie Holiday and Marie Curie. I'm hoping to make more and grow this collection!
Wishing you a lovely day,
Aleka

Tuesday, 2 June 2015

A crocodile


Our weekend project with the nephew: a paper crocodile! Seemed more difficult than it actually was, once you get the general idea then you simply keep going piece by piece and before you know it you're done! For me the hardest part was cutting the smaller pieces, especially the scales and now it will be up to the crocodile to survive an 8 year old!

Hope you have a lovely week and a great new month! Summer is officially here :-)
Aleka

Thursday, 3 July 2014

Work in progress


I've been working on new paper matchbox dioramas, very summery aren't they?

A lovely giveaway right here!
Wishing you a lovely day,
Aleka

Thursday, 19 June 2014

Paper craft


You know when you have an idea in your head and you must make it happen? I've been working on tiny matchbox surprises, soon they'll be in the shop :-)

Hope you had a great week!! Don't miss out on the music celebrations this weekend.
xoxo
Aleka

Wednesday, 21 May 2014

The planets


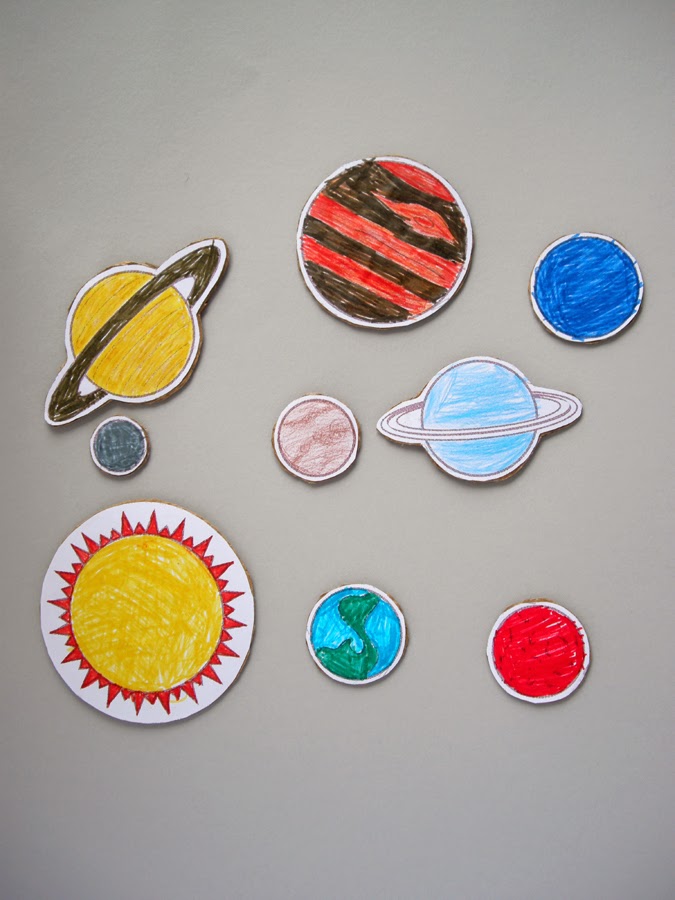
The nephew had no school this Monday so we decided to make our solar system from paper and cardboard. We got the planets from here, printed them, colored them and cut them out. Then I cut cardboard to match each planet and we glued them on. Using brads we secured each planet to a long cardboard strip and attached the other end to the sun, a skewer passes through all the layers of cardboard and the sun. Now the planets can spin around themselves and around the sun :-)

He has another long weekend ahead, no school on Friday and Monday so I'm looking for new projects :-)

Wishing you a lovely day,
Aleka

Tuesday, 6 May 2014

Paper roll flowers


Remember the paper roll flowers? Well the nephew (with some help from us) made one for his mom and one for his dad :-)

Flip book machines with birds and butterflies, they are amazing!
Wishing you a lovely day,
Aleka

Tuesday, 8 April 2014

More birds


My paper mache bird brooches have sold and I decided to make some more :-)
I've been experimenting with old book pages, I want to combine that vintage feel with bright colors and simple patterns. The top two birds are my favorites so far. Hopefully I will finish a couple of brooches this week!

"50 ways to take a break" some interesting suggestions there to keep the inspiration going :-)
Wishing you a great day,
Aleka

Thursday, 7 November 2013

Paper robots


I've been trying to find ways to keep my nephew busy when he finishes his school work, anything to keep him away from the tv. So one afternoon we decided to make robots, he loves transformers, watches the cartoons all the time.

This very angry looking transformer was made from a little medicine paper box, I ripped it apart and glued it so the blank side was showing. We drew the hands and legs, painted them with crayons and then glued them on the body. His face is drawn on the box flap and I used a white piece of paper to close the opening, gluing it on the other two side flaps (the kid wanted it glued shut so flies couldn't get in!)
The transformer is accompanied by a very colorful drawing of... you guessed it: a transformer, it's his portrait.

Wishing you a lovely day,
Aleka

Linked to Homework, LizMarieBlog.

Thursday, 24 October 2013

Halloween houses


Last Halloween craft and it's an easy one :-)
I used this house pattern, transferred it to black and white paper using carbon, it doesn't show on the black paper but on the white it's pretty visible. So I had my nephew paint over the blue lines with a black marker and gave him a silver marker to paint the black houses. I think it's easier for a kid to paint on the paper when it's flat, after he painted them I used glue on the flaps and mini wooden pegs to hold them while the glue dried.

While I waited I made a super quick mini bat garland, just cut bat shapes and little triangles from black paper, add a dab of glue on the back side and glue them on jute string. I used scotch tape to stick it on the wall behind my houses but if you have washi tape with a Halloween pattern that will look great!

The fun thing about these houses is that their tops are not glued so you can lift them and use the inside of the house to keep candy or spooky decorations :-)

xoxo
Aleka

Linked to Homework, Lizmarieblog & Whipperberry

Friday, 18 October 2013

Trick or treat bags


I love working with paper so here's a tutorial for making monster and pumpkin trick or treat bags!

You'll need pva glue, two balloons and pieces of newspaper. You can either pick the balloon with the size you want and blow it up completely or just use the ones you have (I had big size balloons) and just blow it up to the size you want. Start gluing the paper on, cover the entire surface of the balloon leaving enough space at the bottom for your hand to go through. Let each layer dry before applying the next one, four or five layers of paper make a very sturdy bag. Once you have applied the final layer and it is dry pop the balloon, then cut the edge of your bag so that it's even. Apply gesso to the inside and outside before you apply paint. Paint it like a pumpkin or green monster. Make two holes at the side and tie your cord and you're done! My nephew loved the green monster, when he saw it he said "brains, brains" :-)

Tips:
Start with a layer of white wrapping paper (I have a lot of it from Ikea, the one you wrap glass and breakables) that way you won't have to paint the inside. You can also end with a layer of the same paper so won't have to gesso the outside before you paint it.
After you have done all the layers and popped the balloon hold the bag up to the light, that way you'll see the parts that aren't so thick, that's where you'll need to add paper to make them stronger.
Or you can alternate layers between newspaper and wrapping paper so it will be easier to see which parts you've missed.

Hope you like it :-)
Aleka

Linked to Whipperberry and LizMarieblog!

Thursday, 5 September 2013

Folding paper


My mind is still on vacation mode!
I still try to make things, even the tiniest things just to get myself in a creative schedule again.
I've been folding paper to make these origami hearts, following this tutorial.
They can be used as bookmarks and I put one with every order that is sent out :-)
I just love how they look all together, their colors and patterns, such a fun, happy bunch!

Wishing you a lovely day,
Aleka

Friday, 7 June 2013

Paper mache fish


Keeping up with our preparations for the nephews kindergarten party we used these paper mache fish I had made a while back. They were a sort of test to see how easy it would be and how they'd look, I never painted them so now was an excellent occasion to do it. Georgia painted them and she used colors that will pop against a blue background green, red and orange. I love the way they look and hopefully they'll fit right in the decor :-)

A lovely project: continue curioso, you can check out the previous clips they have English subtitles.
Wishing you a lovely weekend,
Aleka

Sunday, 2 June 2013

Jellyfish


This is the project I was talking about:
Paper mache jellyfish! We used glass bowls (they are the ones we use when we make creme caramel), turned them over, covered them with plastic wrap (the one we use to cover foods) and then started gluing pieces of newspaper with pva glue. We did three layers so they are quite thin and lightweight. Once the glue was dry on the outside we took them off the bowls, peeled away the plastic wrap and let them dry completely, you can see in the third photo that the inside is still not dry so we waited a day to be sure.
The next day we painted them with gesso, then acrylics in pink and yellow and then glued yellow crepe paper on the inside. I'm still debating whether I should fill them with more crepe paper, I like they way they look now so I don't know.

The nephew's kindergarten will have a summer party when the school closes for summer and it's a sea themed one. The background the teachers have used is a deep blue paper so I'm sure they'll pop and since the party will be outside the jellyfish will be moving with the wind :-)
Wishing you a great Sunday,
Aleka

Friday, 3 May 2013

Easter eggs and rockets


Yesterday we painted our Easter eggs, while the eggs were hot we "wrote" on them using wax crayons, they melted on the surface of the eggs making them look like marbled. The one in the ceramic bunny is the nephews, he said that's were his egg should go.
And today we made rockets, using tp rolls. We painted them, added a cap and colorful tail. The nephew didn't want his to hang on a string, he carried it around making it fly! Mine is hanging right behind him flying when the wind blows :-)
Wishing you a great weekend and a happy Easter,
Aleka


Thursday, 12 April 2012

Bunnies


For us (Greek orthodox) Easter is this weekend, today is the day we paint our eggs and on Sunday we have a big family meal. Most years we go back to our country home, it really is amazing spending Easter in the countryside with all our relatives but this year we'll be staying in the city and keeping it small.
I made these bunnies from toilet paper rolls and newspaper, today I've coated them with a couple of layers of gesso and then I'll paint a layer of white acrylic. I'm hoping to get my 5 year old nephew to paint them, I'm not sure if he can do it with paintbrushes, we'll try but if it's too difficult we'll use markers or crayons, they are much easier to handle. It's a project for the weekend, keeping him busy and making something too.
See more creative spaces right here!
xoxo
Aleka

Saturday, 31 March 2012

Flower branch


I've been filling vases with flowers, I love their smell and colors so much but it's a bit sad when they wither and I have to throw them out. So I thought I'd make some paper flowers that I can keep in my vase for a long time! I used paper napkins in green color for the leaves, yellow for the flowers and a couple of twigs that I painted white. Cut a round shape fold it a couple of times, scrunch the base and you've got a flower bloom, glue it on the twig. For the leaves cut a longer shape, fold it in half, scrunch the base and use glue to stick it on the twig. That's it simple and easy, hope you like it :-)
Find to more creative spaces!
Have a great weekend
Aleka


Saturday, 11 February 2012

Passing time


I haven't been creative in any other way than to keep my 4 year old nephew busy this week. His teacher was ill so there's been no school and with the freezing cold playing outside is not an option. Here are the paper and pipe cleaners dolls we made, the green one is him, the red faced one is me and the one with red hand and feet is grandma. Super easy to make and he loved them too :-)
Wishing you all a great weekend
Aleka

Friday, 27 January 2012

Flower Tags


Can you tell I'm really missing spring and its flowers? I made these gift tags from thick backing board, I started by cutting two different sized circles. Then painted their back side and stamped it but you could just write a little message, that would be pretty cute too! From the graphics fairy I used two flower prints (1 - 2), I actually fitted four flower graphics in one page then just used two of them. I glued the circles in random places of the flower prints, on the unpainted side of the cardboard then cut of the excess. Punched a hole with the cropadile thingy, tied the pink/red thread and they are perfect for my little gift bags.
Now I have two remaining flower prints, I'm thinking of making something with them too, just haven't decided what that will be yet :-)
See more creative spaces here!
Have a great weekend
Aleka